Twingate is Secure access to private data for your distributed workforce. It provides a simple, modern approach to securing online work Twingate enables organisations to rapidly implement a modern zero-trust network that is more secure and maintainable than VPNs. Delivered as a cloud-based service, Twingate empowers IT teams to easily configure a software-defined perimeter without changing infrastructure, and centrally manage user access to internal apps, whether they are on-prem or in the cloud.
In this guide we will see:
How to deploy Twingate connector on Civo Kubernetes via Marketplace
How to setup twingate account
How to install Twingate client application and access private IP's from the cluster
Deploy Twingate Connector on Civo Kubernetes via marketplace
We'll use Civo Kubernetes, which is based on K3s, to experiment with this quickly. If you don’t yet have an account, sign up here. You could also use any other Kubernetes cluster you have access to.
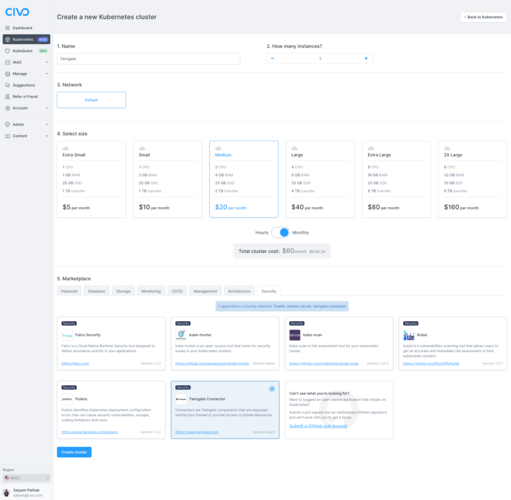
Create a new cluster from the UI (you can also use Civo CLI) and select Twingate app from the marketplace

Once ready you should see the cluster with ready nodes.

Make sure you have kubectl installed, and the kubeconfig file for your cluster downloaded so that you can run kubectl get nodes and get details of the cluster you just created:
kubectl get nodes
NAME                                STATUS   ROLES                  AGE   VERSION
k3s-twingate-fc341107-node-4c50     Ready    <none>                 68s   v1.20.2+k3s1
k3s-twingate-fc341107-master-eeb3   Ready    control-plane,master   78s   v1.20.2+k3s1
k3s-twingate-fc341107-node-3fa2     Ready    <none>                 67s   v1.20.2+k3s1
Check the Twingate connector installation
kubectl get pods
NAME                                  READY   STATUS                       RESTARTS   AGE
twingate-connector-7d77f45b9b-g5g5r   0/1     CreateContainerConfigError   0          117s
It will be in CreateContainerConfigError as we need to create a configmap and secret that will be done in the next step.
Twingate setup walkthrough
In this we will setup Twin gate account and get the tokens for creating configmap and secret
Go to twingate.com to create a trial account and get Started

Signup with your preferred method and enter the team

Select the private resources that you want to access

Add Team members

Select a plan to try out
 For this demo we just choose Twingate teams
Setup the connector

Add a connector

Generate the tokens

Create following secret with the tokens from above
apiVersion: v1
kind: Secret
type: Opaque
metadata:
  name: connector
stringData:
  accessToken: "Access Token"
  refreshToken: "Refresh Token"
Also create a config map as below Here th eurl will be the once you chose during setup.
apiVersion: v1
kind: ConfigMap
metadata:
  name: connector
data:
  url: https://civo.twingate.com
After creating the configmap and secret you should see the status as connected

Create a deployment
apiVersion: apps/v1
kind: Deployment
metadata:
  name: demo
spec:
  replicas: 1
  selector:
    matchLabels:
      app: demo
  template:
    metadata:
      labels:
        app: demo
    spec:
      containers:
        - name: demo
          image: nginxdemos/hello:latest
Go to the Network and add resource

Add resource with the IP of the pod
kubectl get pods -owide
NAME                                  READY   STATUS        RESTARTS   AGE   IP           NODE                               NOMINATED NODE   READINESS GATES
demo-58f4cb989b-jzm68                 1/1     Running       0          14s   10.42.1.7    k3s-linkerd-60ab3687-node-dcfa     <none>           <none>

Twingate client application and connecting to the resource created
In this section we will install the Twingate client application on MacOS and then connect to the resource created in above step via the browser.
Now install twingate locally on Mac -> docs.twingate.com/docs/macos

Configure the client app


You will be able to see the network connected and open the deployed application in browser


Wrapping up
In this way you can connect the resources within the network from anywhere. These are the private ip's assigned to the pods that you are able to access directly from the browser even without exposing the services!! Let me know on Twitter @SaiyamPathak if you try Twingate out on Civo Kubernetes!

